Kohei Fujii Guitars

Kohei Fujii Guitars

Sunday, December 19, 2021

Back Bracing

     Back bracing work is done. Back bracing material is Sitka Spruce. Sitka has very good straight grain. Also, Sitka is the strongest spruce materials. I have been using the Sitka spruce for the back bracing. My back has 5x5 lattice bracing. Lattice bracing is very easy to install by using the vacuum bagging technique. Also, the lattice back bracing makes really beautiful 12' radius domed back. My back has relatively strong doming of 12' radius. So, the lattice bracing is the best for supporting back strongly without weigh increase penalty. 

     Next step is the slide making. I will laminate sides between African Padauk and the Alaskan yellow cedar. 


Sunday, December 12, 2021

Bracing work 2

 Sound board bracing work is still on going. Now, installing all bracing bars is completed. Traditional way of making top is using a Go-bar technique for non shaped bracing wood gluing. Them, all bracings are shaped. However, I always shape bracings before installing. This technique enables to shape bracing bars very aggressive way. Unlike the go-bar technique, the vacuum clamping method enables to install shaped bracing bars. I usually leave the top couple of weeks after complete the bracing installation. Then, I will take scalloping for all bracing bars. 

Next step is making the back using the lattice bracing. 


Sunday, December 5, 2021

Bracing work

 I start working on the bracing work for the top. Bracing work starts with the bridge plate install. I selected the Padauk for the bridge plate material. Then, I re-saw the bracing material from Adirondack logs. For the X-bracing material, I selected carefully to obtain the best straight grained piece. I usually shape the bracing material before install to the top. Then, I install X-bracing using a vacuum bag technique. I apply glue for both the bracing wood and the top for the void free gluing. This technique requires extra work for the excess glue cleaning. However, I am able to get the best glue joints. 


Sunday, November 28, 2021

SSJ Built start

 A custom SSJ model built is started. This guitar will use Adirondack spruce top, padauk side and back, and Mahogany neck. This time, I made a new Rosetta design using sported Tamarindo and padauk. I also installed a Madagascar RW center strip in the padauk back. Padauk has very nice metallic tap-tone like a Brazilian RW. However, padauk is much lighter than rose wood. Also, grains are straight, and almost no clacking issues. Padauk is not oily, and the sanding work is very easy. For me, this is one of the best guitar materials. Only one negative side is that this material is toxic. I have to be very careful about the sanding work for the dust management. 


Brazilian MD Complete

 Brazilian MD built is completed. The MD made well balanced tone from bus to treble peaked at G-strings in open position. Action settings at 12th fret are 1.8mm for high-E and 2.3mm for low-E. This guitar goes to Taiwan; therefore, I made very low action setting. Taiwan has high temp and high humidity all year long. Usually, a guitar makes higher string action due to the sound board expansion under the high temp and high humid conditions. I hope, this guitar does not need the action adjustment. I did very minor tightening for the truss rod setting. The neck has minor bow for the best strings setting. I hope the new owner enjoys the guitar.


Sunday, November 14, 2021

Bridge install and more

 Bridge install, fret wire leveling, and boiled rinseed oil apply to the finger board are done. I am working on nut and saddle making. This guitar also needs to install tuning machines. So, this guitar is almost ready to test drive. This Brazilian MD project started in May 23. So, it has been almost 6-month to complete this project. I will complete this guitar making next week, and this guitar will be shipped to Taiwan for the happy new owner.


Monday, November 8, 2021

Finishing work

 Finishing work is almost done. I completed final sanding using 2000 grit water paper. Now, I am working on the polishing work. Bridge install has not been done. I just placed the bridge temporarily. I need to polish the bridge before install. Those photos show the first polishing results. Those are not the final polishing. So, it takes couple of days to complete the finishing work. I hope I can test drive this guitar this week-end. 


Sunday, October 24, 2021

Final coat applying

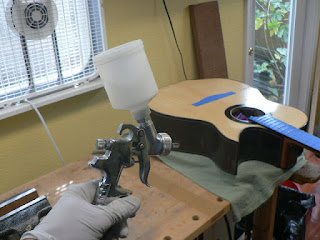
      All Epoxy filling work and sanding work have been done. I am applying final coat. I finished five final coats at this moment. I have been using EM6000 water based acrylic finish from Target coating. After five coats apply, I examined missing spots for the filling work. I found some spots, and I filled with EM6000 + Silica thickener mixture. I will have a light sanding session for flattening the filled spots. Then, I will apply additional EM6000 five coats. Today is 10/25 Sunday, and it is raining. This is the first major storm here in California. So, I do not have spaying sessions today. I will resume the spraying work in this week after the sun comes back.  

     I also applied Epoxy filler on the bridge. This is a second session for the bridge. I will apply five EM6000 coats over the bridge. 


Sunday, October 17, 2021

Neck shaping and final sanding

 Neck shaping and final sanding work have been done. The neck has 21mm thickness at 1st fret and 23mm at 10th fret. This is my standard neck thickness. This time, I made a Gibson style volute that has a gentle curve at the nut section. Gibson neck has famous neck head braking issue from an unwanted impact. This is due to the Mahogany grain selection at the neck head. My neck has a V-joint in between the neck and the neck head. My neck head has a flat sawn cut that makes the best impact resistance. Therefore, my guitar neck has some of the best impact resistance. After complete the neck shaping, I did sanding work, and then I applied two Epoxy filler sessions. Now, this guitar is ready for the spraying sessions.