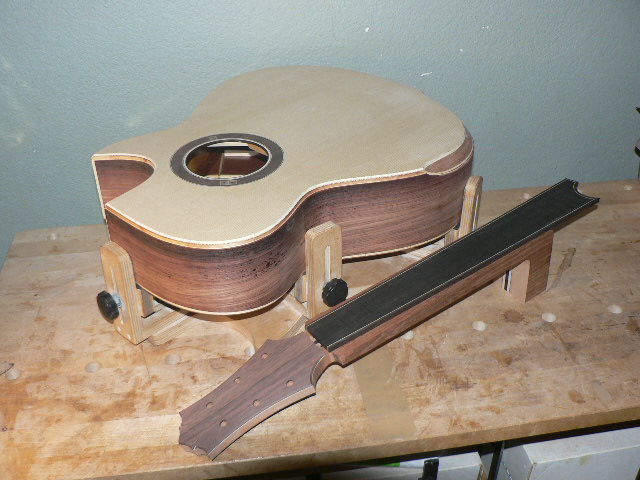
I made a 24.9" scale finger board with binding. I did not take a photo for the slotting work; however, I did slotting work for the 24.9" scale. Finger board material is West African Ebony and the binding material is African Black wood. This finger board has a Maple boarder. Finger board has a 21 fret extension. This extension is needed, because of the 12 fret joint design. Without the fingerboard extension, this guitar would be the 19 fret finger board. After complete the fingerboard, I am working on the binding work for the body. This is a very time consuming and detailed work. I will report the binding work next week.
Kohei Fujii Guitars
Sunday, January 3, 2021
Sunday, December 27, 2020
Neck making part-2
After completed the head joint, I made truss rod channeling, head thickness profiling, and veneer install. Sold neck head thickness must be 14.5mm. Late Taku Sakashita who was my guitar making mentor always told me that the most beautiful neck head thickness is 14.5mm. When I make the sold head neck, I always try to make the 14.5mm thickness. This neck has a Madagascar RW top veneer, and a Katalox back veneer. This neck also has a beautiful volute.
Sunday, December 20, 2020
Neck making
Body is closed and the binding channels cut. Now, I move to the neck making. This guitar has 24.9" scale. I will use the 7-ply (Spanish cedar, black dyed maple, Maple, Ebony, Maple, black dyed maple, and Spanish cedar) laminated neck. I use the V-joint between the neck and the head. I also use the laminated head. Material is the Spanish cedar. Although, I do not show the fitting work for the V-joint, I spend a lot of time for the precise fitting.
Next week, I will continue the neck making work. I will make a finger board with binding.
Sunday, December 13, 2020
Closing Box
Finally, I closed the box. I usually assemble the back first, because I am able to clean the excess glue. Excess glue will be visible; therefore, I have to clean-up nicely. Before install the top, I applied three coats of shellac to the top. I have to avoid contamination for the glue line on the top. The top shown below is the final voiced top. Side bars have very deep scalloping for the best vibration. Although, the photo does not show the shellac coating in the back, I applied three coats of shellac to the back, before closing the box. The last photo shows the clumping for the top gluing.
Next week, I move to the neck making.
Sunday, December 6, 2020
Voicing the top and fitting to the side
I did the final voicing for the top using scalloped shaping technique. Voicing work is still on going. I need to add scalloped shapes to the four side bars. I am slowly progressing the scalloped bracing work.
I also completed the back brace and center strip fitting work to the side. I also applied couple of coats of shellac to the side. My guitars always have inside sealing using couple of coats of shellac. After glue the back to the side, I will apply couple of coats of shellac to the back also. I will use the spraying technique for the shellac apply to the back, because the lattice bracing requires messy and time consuming brushing work.
Sunday, November 29, 2020
Carbon fiber rods install, and Sold lining install
Carbon fiber rods are installed for the body deformation prevention. After complete the body thickness adjustment, I installed two carbon fiber rods from the neck block to the body bottom. Those rods are relatively new technique for the body deformation prevention issue. Steel strings guitars are slowly deforming over 20years from a freshly built. Therefore, almost all guitars require a neck re-setting work after 20 to 30 years from the fresh built. Those carbon rods are able to solve this issue. Those carbon rods bracing are also improves body rigidity particularly around the neck joint. This solid body construction also improves sound quality to generate more over tones.
I also completed solid lining making and install. I have been using solid linings for all of my guitar making projects. Solid linings make very solid joint between the top and the side. The solid joint maximizes the sound board vibration efficiency with minimum energy loss. Conventional kerfed linings are almost a sponge for me. Solid linings require many steps to make and install. However, the solid lining makes extremely crispy sound. This is almost a high definition tone.
Sunday, November 22, 2020
Neck block and Cut-a-way block, and Beveled armrest block are installed. Cut-a-way block install is a tricky work. I have a custom designed clumping device. I have been using two shock codes for making decent pressure for the cut-a-way block gluing. Beveled armrest install is also pretty tricky work. I designed custom clumping blocks for this special work. Using this special block, the beveled armrest is nicely and securely installed. Doing work for the sound board side is also completed.
Now, the body assembly is completed. I will install linings and two carbon fiber rods for the body deformation prevention.