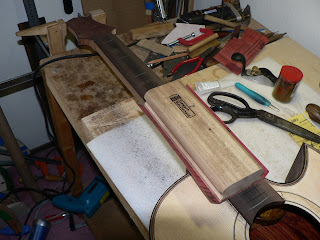
Neck shaping for the MD model is completed. Cross-section of the neck is precisely shaped based on a template for 1-st fret and 10-th fret. Machine head holes are also drilled, and I did temporarily installed machine heads. Machine heads are Goto 510 delta model that has 21:1 gear ration. This model has the best gear ratio that enables very quick and precise tuning change for different open tunings. Neck heal is also shaped as steep as possible for easy access to the high position. This neck design also has a beautiful volute at 0-fret position. This is a Taku's signature design, and I have been keeping this design feature.
Kohei Fujii Guitars

Sunday, August 26, 2012
Sunday, August 19, 2012
Neck Making 5
This week, I finished finger board surfacing, radiusing, fret-wire install, and neck rough shape.
I have been using 20' radius for the fingerboard. I remove almost 80% of fret-wire tangs, because the tangs expand fingerboard slots. It makes the neck's reverse bending. Some builders use this effect as the neck re-enforcement. However, the neck curve control is extremely difficult. I do not want to change neck bend after install the fret wires. So, my neck shape will never be changed after install the fret-wires. I use yellow glue for the fret wire install. Usually, I do not have a fret-wire leveling session during the guitar neck set-up, because the fret wires are already precisely leveled.
For the neck shaping, I start with neck thickness shape, and thicknesses are 21mm at 1-fret and 23mm at 11-fret respectively. Then, I remove the neck's shoulders. After, finish the rough shaping, I will use a home made large sanding board for final neck shaping. This is the quickest, and most accurate neck shaping technique for me.
Sunday, August 12, 2012
Neck making 4
I have been continuously working on the neck construction project.This week, I did finger-board making, install, neck outline shaping, heel portion rough cut, and heel cap install. Now, both MD and Nylon models revile really sexy outlines. MD model has a 44mm wide at 0-fret, 25.4" scale, slim 14th fret joint neck, and Nylon model has a 50-mm wide at 0-fret, 650mm scale, low profile 12th fret joint neck. Both models have approximately 5-mm raised neck setting at the neck jointing position. Finger board on the raised neck is isolated from the guitar top above 12th or 14th frets depending on models. This design makes best sound quality above the neck joint portion due to the enough supporting material underneath of the finger-board.
Next week, I install fret wires, and start neck shaping.
Next week, I install fret wires, and start neck shaping.
Sunday, August 5, 2012
Neck making 3
This week, I did graphite rod install, truss rod install, and head plate veneer install. I always cover the truss rod and graphite rod channels with wood filling rods. This makes easy adjustment for finalizing neck angle adjustment using hand planes. Also, wood filling technique minimizes a rattling problem from the truss rod.
This time, I used King wood for neck head veneer for MD model. For nylon model, I used Myrtle for head plate veneer.
Next steps are finger-board install, neck outline shape, and neck profile shape. Now, those guitar construction projects are final chapters as the wood working part.
This time, I used King wood for neck head veneer for MD model. For nylon model, I used Myrtle for head plate veneer.
Next steps are finger-board install, neck outline shape, and neck profile shape. Now, those guitar construction projects are final chapters as the wood working part.
Subscribe to:
Comments (Atom)


